LinearLayout
LinearLayout은 가장 기본적인 레이아웃으로서 view들을 일렬로 배치한다.
따라서 view들을 배치할 방향인 orientation 옵션을 필수적으로 지정해주어야 한다.
<LinearLayout
android:layout_width="match_parent"
android:layout_height="match_parent"
android:orientation="horizontal">
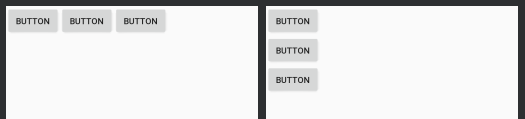
</LinearLayout>왼쪽 이미지가 orientation 값을 horizontal(수평)으로 설정했을 때
오른쪽 이미지가 vertical로 설정했을 때
<Button
	android:id="@+id/button1"
	android:layout_width="wrap_content"
	android:layout_height="wrap_content"
	android:layout_gravity="center_horizontal"
	android:text="Button" />
<LinearLayout
android:layout_width="match_parent"
android:layout_height="match_parent"
android:gravity="center_horizontal"
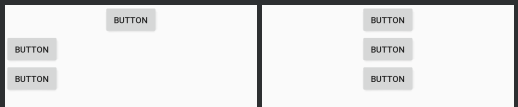
android:orientation="vertical">원하는 view를 가운데로 정렬시키고 싶다면 view에 android:layout_gravity="center_horizontal" 속성을
레이아웃 안의 모든 view를 정렬시키려면 레이아웃에 android:gravity="center_horizontal" 속성을 넣어주면 된다.
<Button
android:id="@+id/button1"
android:layout_width="0dp"
android:layout_height="wrap_content"
android:layout_weight="1"
android:text="Button" />
<Button
android:id="@+id/button2"
android:layout_width="0dp"
android:layout_height="wrap_content"
android:layout_weight="2"
android:text="Button" />
<Button
android:id="@+id/button3"
android:layout_width="0dp"
android:layout_height="wrap_content"
android:layout_weight="1"
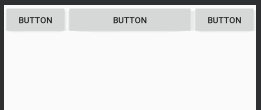
android:text="Button" />그리고 LinearLayout 안의 view들에 weight 값을 주어 레이아웃 공간을 원하는 비율만큼 차지하도록 할 수 있다.
※ 이 때 width값을 0dp로 설정해주어야 올바른 비율로 설정된다.
RelativeLayout
RelativeLayout은 뷰의 위치를 다른 뷰나 부모 뷰와의 상대적인 위치로 결정한다.
이는 ConstraintLayout과 비슷하지만 RelativeLayout에 비해 ConstraintLayout이 훨씬 많은 기능을 지원한다.
최신 버전에서는 기본 레이아웃이 Linear에서 Constraint로 변경된 만큼 많이 발전되었고 성능도 Relative보다 낫다.
그래도 아직까지 자주 사용되고 있는 Layout인 만큼 사용법을 알아보자.
<Button
android:id="@+id/button"
android:layout_width="wrap_content"
android:layout_height="wrap_content"
android:layout_alignParentStart="true"
android:layout_alignParentLeft="true"
android:layout_alignParentTop="true"
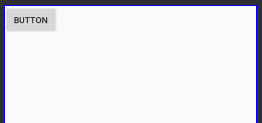
android:text="Button" />부모 뷰의 왼쪽과 위쪽을 기준으로 하겠다면 alignParent방향 속성을 true로 해주면 된다.

android:layout_marginStart="50dp"
android:layout_marginLeft="50dp"
android:layout_marginTop="50dp"
기준으로부터 얼마나 떨어진 위치에 놓을 것인지는 margin 옵션을 통해 지정하면 된다.
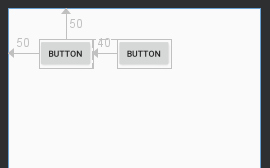
<Button
	android:id="@+id/button2"
	android:layout_width="wrap_content"
	android:layout_height="wrap_content"
	android:layout_toRightOf="@+id/button"
	android:layout_toEndOf="@+id/button"
	android:layout_alignTop="@+id/button"
	android:layout_marginLeft="40dp"
	android:layout_marginStart="40dp"
	android:text="Button" />
다른 뷰를 기준으로 위치를 정하고 싶다면 alignParent가 아닌 align위치 속성에 기준 뷰를 지정해주면 된다.
하지만 align 속성만으로는 뷰의 왼쪽 면이 기준 뷰의 오른쪽 면에 오게 하기 힘들다.
이 때에는 above, below, toRightOf, toLeftOf 옵션을 사용해주면 된다.
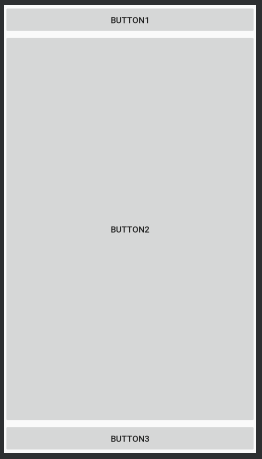
<Button
	android:id="@+id/button1"
	android:layout_width="match_parent"
	android:layout_height="wrap_content"
	android:layout_alignParentTop="true"
	android:text="Button1" />

<Button
	android:id="@+id/button2"
	android:layout_width="match_parent"
	android:layout_height="match_parent"
	android:layout_below="@+id/button1"
	android:layout_above="@+id/button3"
	android:text="Button2" />

<Button
	android:id="@+id/button3"
	android:layout_width="match_parent"
	android:layout_height="wrap_content"
	android:layout_alignParentBottom="true"
	android:text="Button3" />
이를 응용하여 Button1이 위쪽, Button2이 아래쪽으로 정렬되어 있을 때,
나머지 공간을 Button2가 사용하도록 할 수 있다.
LinearLayout에서 이를 구현하려면 크기를 일일이 계산해주어야 하는데
RelativeLayout에서는 두개의 옵션만으로 간단히 구현할 수 있다는 장점이 있다.
FrameLayout
FraneLayout의 경우 한번에 하나의 뷰만 보여주는 레이아웃이다.
따라서 맨 앞에 보여지는 뷰 외의 모든 뷰는 아래에 중첩되어 쌓이게 된다.
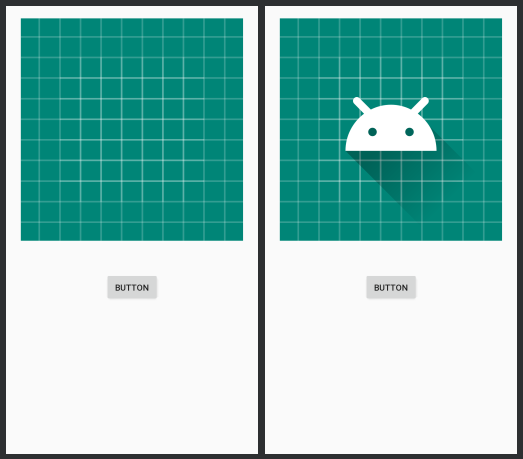
<FrameLayout
	android:id="@+id/frameLayout"
	android:layout_width="match_parent"
	android:layout_height="365dp"
	app:layout_constraintTop_toTopOf="parent"
	app:layout_constraintStart_toStartOf="parent"
	app:layout_constraintEnd_toEndOf="parent" >

	<ImageView
		android:id="@+id/background"
		android:layout_width="match_parent"
		android:layout_height="363dp"
		android:src="@drawable/ic_launcher_background"
		android:visibility="visible" />

	<ImageView
		android:id="@+id/foreground"
		android:layout_width="match_parent"
		android:layout_height="match_parent"
		android:src="@drawable/ic_launcher_foreground"
		android:visibility="invisible" />

</FrameLayout>
public void onButtonClicked(View v){
ImageView fore = findViewById(R.id.foreground);
if(fore.getVisibility()==View.VISIBLE)
fore.setVisibility(View.INVISIBLE);
else
fore.setVisibility(View.VISIBLE);
}먼저 FrameLayout 안에 배경 이미지와 안드로이드 이미지를 넣었고, 배경은 보이고 안드로이드는 안보이도록 설정했다.
그 뒤 Activity에서 버튼을 눌렀을 때 안드로이드 아이콘이 보였다 안보였다 하도록 구현하였다.
이처럼 FrameLayout은 일부 뷰는 보여주고 일부 뷰는 안보여주도록 하면서 화면 전환을 하기 위해 사용된다.
Reference
[부스트코스]안드로이드 프로그래밍
'Android > Concepts' 카테고리의 다른 글
| 기본적인 Drawable 사용법 - Selector, Shape (0) | 2019.07.18 |
|---|---|
| 기본적인 Widget 사용법 - TextView, Button, EditText, ImageView (0) | 2019.07.16 |
| ConstraintLayout의 특징 및 사용법 (0) | 2019.07.14 |
| View, ViewGroup, XML Layout 이란? (0) | 2019.07.13 |
| Android Studio에서 앱 실행하기 - 가상 머신 / 스마트폰 (0) | 2019.07.13 |


