Service란?
그동안 다루었던 Activity와 다르게 Service는 화면에 보이지 않는다.
Service는 Activity와 같이 안드로이드의 컴포넌트이기 때문에 onCreate(), onDestroy() 메소드를 갖고 있다.
그리고 사용할 때 주의할 점으로는 종료 시에 시스템이 자동으로 재시작 시켜주기 때문에 조심해야 한다.
사용법
추가하는 방법은 Activity와 비슷하다.
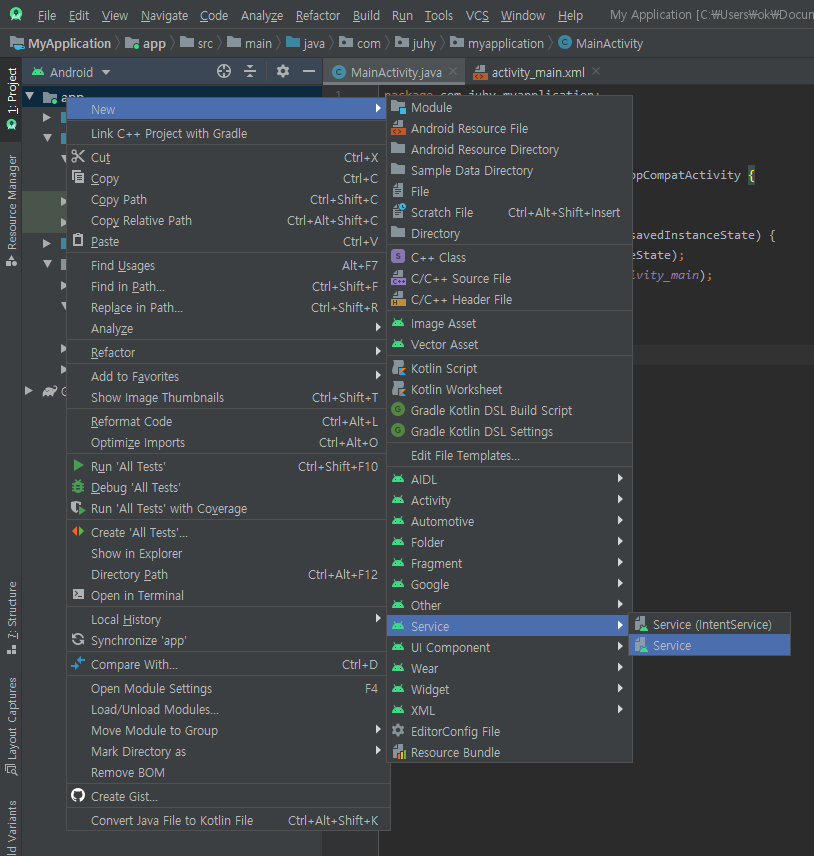
Project Explorer에서 app을 오른쪽 클릭한 뒤 new - Service - Service 를 클릭하여 생성할 수 있다.

Service의 이름을 지정한 뒤 Finish를 눌러주면 자동으로 클래스 뿐만 아니라 Manifest에 등록된다.
package com.juhy.myapplication;

import androidx.appcompat.app.AppCompatActivity;

import android.content.Intent;
import android.os.Bundle;
import android.view.View;
import android.widget.Button;
import android.widget.EditText;

public class MainActivity extends AppCompatActivity {

    EditText editText;

    @Override
    protected void onCreate(Bundle savedInstanceState) {
        super.onCreate(savedInstanceState);
        setContentView(R.layout.activity_main);

        editText = findViewById(R.id.editText);

        Button button = findViewById(R.id.button);
        button.setOnClickListener(new View.OnClickListener() {
            @Override
            public void onClick(View v) {
                String text = editText.getText().toString();

                Intent intent = new Intent(getApplicationContext(), MyService.class);
                intent.putExtra("command", "show");
                intent.putExtra("text", text);

                startService(intent);
            }
        });

    }

}
사용자가 입력한 글자를 서비스에 전달하며, 실행시키도록 구현해보자.
먼저 MainActivity에서는 버튼을 누르면 글자를 읽어와 intent에 넣어 서비스를 시작해준다.
이 때 Activity를 시작할 때와 다른 점은 startActivity()가 아닌 startService()를 사용한다는 점이다.
package com.juhy.myapplication;

import android.app.Service;
import android.content.Intent;
import android.os.IBinder;
import android.util.Log;

public class MyService extends Service {

    private static final String TAG = "MyService";

    public MyService() {
    }

    @Override
    public void onCreate() {
        super.onCreate();
        Log.d(TAG, "onCreate() called");
    }

    @Override
    public int onStartCommand(Intent intent, int flags, int startId) {
        Log.d(TAG, "onStartCommand() called");

        if(intent == null){
            // 서비스가 종료 시 자동으로 재시작 옵션
            return Service.START_STICKY;
        }
        else {
            String command = intent.getStringExtra("command");
            String text = intent.getStringExtra("text");
            Log.d(TAG, "received data: " + command + ", " + text);
        }

        return super.onStartCommand(intent, flags, startId);
    }

    @Override
    public void onDestroy() {
        super.onDestroy();
        Log.d(TAG, "onDestroy() called");
    }

    @Override
    public IBinder onBind(Intent intent) {
        // TODO: Return the communication channel to the service.
        throw new UnsupportedOperationException("Not yet implemented");
    }
}
MyService 클래스에서는 기본적인 메소드 외에 onCreate(), onStartCommand(), onDestroy() 함수들을 불러와 주었다.
그동안 activity에서는 onCreate()에 주로 코드를 작성했다면 서비스는 한번 실행 후 쭉 유지되기 때문에 onStartCommand()에서 주로 작업하게 된다.
여기서 파라미터로 넘어온 intent에서 데이터를 불러와 로그를 찍어보도록 하자.
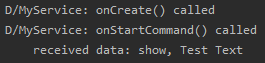
앱을 실행해 버튼을 눌러보면 onCreate(), onStartCommand()가 호출되고, 데이터도 정상적으로 전달된 것을 볼 수 있다.
이 때 다시 한번 버튼을 누르면 onCreate()는 호출되지 않고 onStartCommand()만 호출되는 것을 볼 수 있다.
그렇다면 Service에서 Activity로는 어떻게 데이터를 보낼까?
Intent showIntent = new Intent(getApplicationContext(), MainActivity.class);
showIntent.addFlags(Intent.FLAG_ACTIVITY_NEW_TASK |
        Intent.FLAG_ACTIVITY_SINGLE_TOP |
        Intent.FLAG_ACTIVITY_CLEAR_TOP);
showIntent.putExtra("command", "show");
showIntent.putExtra("text", text + " from service");
startActivity(showIntent);
보내는 방법은 Activity와 크게 다르지 않다.
onStartCommand() 안에서 Intent를 생성해주고 데이터를 넣어준다.
이 때 Service는 화면이 없기 때문에(task가 없기 때문에) 화면에 접근할 수 없다.
따라서 새로운 task를 만들어주는 flag와, 이미 activity가 실행되고 있을 때 중복 실행을 막는 flag도 추가해주어야 한다.
서비스에서 extra 데이터를 담은 뒤 보냈다면 이제 activity에서 받는 부분을 만들어보자.
package com.juhy.myapplication;

import androidx.appcompat.app.AppCompatActivity;

import android.content.Intent;
import android.os.Bundle;
import android.view.View;
import android.widget.Button;
import android.widget.EditText;
import android.widget.Toast;

public class MainActivity extends AppCompatActivity {

    EditText editText;

    @Override
    protected void onCreate(Bundle savedInstanceState) {
        super.onCreate(savedInstanceState);
        setContentView(R.layout.activity_main);

        editText = findViewById(R.id.editText);

        Button button = findViewById(R.id.button);
        button.setOnClickListener(new View.OnClickListener() {
            @Override
            public void onClick(View v) {
                String text = editText.getText().toString();

                Intent intent = new Intent(getApplicationContext(), MyService.class);
                intent.putExtra("command", "show");
                intent.putExtra("text", text);

                startService(intent);
            }
        });

        Intent passedIntent = getIntent();
        processCommand(passedIntent);
    }

    @Override
    protected void onNewIntent(Intent intent) {
        super.onNewIntent(intent);
        processCommand(intent);

    }

    private void processCommand(Intent intent){
        if(intent != null){
            String command = intent.getStringExtra("command");
            String text = intent.getStringExtra("text");
            Toast.makeText(getApplicationContext(), "received data: " + command + ", " + text, Toast.LENGTH_SHORT).show();
        }
    }
}
앱이 처음 실행되었을 경우와 이미 실행되고 있는 경우가 있을 수 있기 때문에 두 경우 모두 메소드를 호출하도록 한다.
(onCreate() 마지막과 onNewIntent()에서)
메소드에서는 intent가 제대로 들어왔다면 extra 데이터를 받아온 뒤 toast로 띄워주도록 했다.
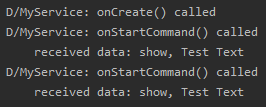
앱이 처음 실행되면 들어온 데이터가 없으므로 toast에 null로 뜨는 것을 볼 수 있고,
버튼을 누르면 정상적으로 데이터가 전달되어 온 것을 볼 수 있다.
Reference
[부스트코스]안드로이드 프로그래밍
'Android > Concepts' 카테고리의 다른 글
| Permission 획득하기 (0) | 2020.04.04 |
|---|---|
| Broadcast Receiver를 이용한 SMS 수신 (3) | 2020.04.04 |
| Activity Lifecycle(수명주기)란? (0) | 2020.04.03 |
| Intent를 이용한 Activity 간 데이터 전달 (0) | 2020.04.03 |
| Intent의 Flag 사용법 (0) | 2020.04.02 |


