TableLayout이란?
TableLayout은 View들을 표와 같은 형태로 담는 레이아웃이다.
전체 레이아웃인 TableLayout 안에 여러개의 행, TableRow를 추가하여 그 안에 View를 배치한다.
기본적인 사용법
<?xml version="1.0" encoding="utf-8"?>
<TableLayout xmlns:android="http://schemas.android.com/apk/res/android"
    android:layout_width="match_parent"
    android:layout_height="match_parent"
    android:stretchColumns="0, 1, 2">

</TableLayout>
먼저 위와 같이 TableLayout을 생성해준다.
이 때 stretchColumns 옵션에 0,1,2는 0,1,2번째 열로 레이아웃을 채운다는 설정이다.
<?xml version="1.0" encoding="utf-8"?>
<TableLayout xmlns:android="http://schemas.android.com/apk/res/android"
    android:layout_width="match_parent"
    android:layout_height="match_parent"
    android:stretchColumns="0, 1, 2">

    <TableRow
        android:layout_width="match_parent"
        android:layout_height="wrap_content">

    </TableRow>

    <TableRow
        android:layout_width="match_parent"
        android:layout_height="wrap_content">

    </TableRow>

</TableLayout>
그 다음 TableRow를 원하는 만큼 추가하고
    <TableRow
        android:layout_width="match_parent"
        android:layout_height="wrap_content">

        <TextView
            android:layout_width="wrap_content"
            android:layout_height="wrap_content"
            android:text="이름 : "/>

        <EditText
            android:layout_width="wrap_content"
            android:layout_height="wrap_content"
            android:layout_span="2"/>

    </TableRow>
첫 번째 줄에는 TextView와 EditText를 추가해 보자.
이 때 layout_span을 통해 해당 View가 몇 개의 column을 차지할 지를 지정할 수 있다.
    <TableRow
        android:layout_width="match_parent"
        android:layout_height="wrap_content">

        <Button
            android:layout_width="wrap_content"
            android:layout_height="wrap_content"
            android:text="아니오"
            android:layout_column="1"/>

        <Button
            android:layout_width="wrap_content"
            android:layout_height="wrap_content"
            android:text="예"
            android:layout_column="2"/>

    </TableRow>
그리고 두 번째 줄에는 Button 두 개를 추가하고,
layout_column을 통해 해당 View가 어떤 column에 위치할 지 지정한다.
이제 결과를 확인해보자.
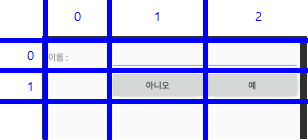
첫 번째 줄의 TextView는 0번째 column, EditText는 1, 2번째 column 2개를 맞게 차지하고 있고,
두 번째 줄의 버튼 두 개가 각각 1번째, 2번째 column에 위치한 것을 볼 수 있다.
Reference
[부스트코스]안드로이드 프로그래밍
'Android > Concepts' 카테고리의 다른 글
| 기본적인 Event 처리 - Touch, Gesture, Key (0) | 2019.08.01 |
|---|---|
| ScrollView 사용법 (0) | 2019.07.30 |
| 기본적인 Drawable 사용법 - Selector, Shape (0) | 2019.07.18 |
| 기본적인 Widget 사용법 - TextView, Button, EditText, ImageView (0) | 2019.07.16 |
| 기본적인 Layout 사용법 - Linear, Relative, FrameLayout (0) | 2019.07.15 |


